Site Identity
Site Title
- Navigate to Appearance → Customise → Site Identity.
- Enter a new site title
- Click the ‘Save & Publish’ button.
Adding a Site Logo
You can choose to upload a site logo which will automatically replace the site title text.
- Navigate to Appearance → Customise → Site Identity.
- Under the Site Logo section click on ‘Select Image’.
- Choose the image or logo from your media library or select the ‘Upload Files’ tab to upload a new file.
- Click the ‘Save & Publish’ button.
Site Description
- Navigate to Appearance → Customise → Site Identity.
- Edit the Site Description or to remove it completely delete the default text.
- Click the ‘Save & Publish’ button.
Site Icon
The Favicon or Site Icon is the tiny image that appears next to your website address in the browser. Icons must be square and at least 512px wide by 512px tall. WordPress will allow you to crop the image you are uploading if it exceeds the recommended size.
- Navigate to Appearance → Customise → Site Identity.
- Under Site Icon click the ‘Select Image’ button.
- Choose the image or icon from your media library or select the ‘Upload Files’ tab to upload a new file.
- Click the ‘Save & Publish’ button.
Colours
Changing Text and Link Colours
Here you can adjust the colours of the text and links in the sidebar and the main content area independently.
- Navigate to Appearance → Customise → Colours.
- Click on the ‘Select Colour’ bar and use the colour picker to choose a new colour. Click the ‘Default’ button to return to the theme’s default colour.
- Click the ‘Save & Publish’ button when you are happy with your choices.
Backgrounds (Colours and Images)
In this section you can change the colour of your sidebar and main content area. Should you wish, you can even add an image to the main content area and one to the sidebar.
Sidebar Background
- Navigate to Appearance → Customise → Backgrounds → Sidebar Background.
- Click on the ‘Select Colour’ bar and use the colour picker to choose a new colour. Click the ‘Default’ button to return to the theme’s default colour.
- To choose a background image click the ‘Select Image’ button.
- Choose the image from your media library or select the ‘Upload Files’ tab to upload a new file. Set the background settings to suit your image.
- Click the ‘Save & Publish’ button.
Main Background
- Navigate to Appearance → Customise → Backgrounds → Main Background.
- Click on the ‘Select Colour’ bar and use the colour picker to choose a new colour. Click the ‘Default’ button to return to the theme’s default colour.
- To choose a background image click the ‘Select Image’ button.
- Choose the image from your media library or select the ‘Upload Files’ tab to upload a new file. Set the background settings to suit your image.
- Click the ‘Save & Publish’ button.
Custom Menus
Inxhibit supports up to four custom menus, each can be displayed with or without a title heading. You can add pages, posts, custom links and category archive links to the menus. Custom menu settings can be found under Appearance → Menus or under Appearance → Customise → Menus.
Creating a New Menu and Assigning it to a Location
- Click Appearance → Menus.
- Click ‘Create a New Menu’.
- Enter a Menu Name and click the ‘Create Menu’ button.
- Under Menu Settings check one of the Theme locations (e.g. Primary Sidebar Menu) press the ‘Save Menu’ button.
- Select Pages, Posts, Custom Links or Categories from the left and click ‘Add to Menu’.
- Click ‘Save Menu’.
Repeat this step if you wish to add additional menus to the remaining three menu locations.
Displaying a Title Above the Menu
You can choose to display a title heading above a menu.
- Navigate to Appearance → Customise → Menus → Menu Titles.
- Add your title into one of the four provided fields.
- Click the ‘Save & Publish’ button.
- To delete simply remove the text and click the ‘Save & Publish’ button.
Creating a Static Front Page
Your Home page can display your latest blog posts, any static page, or one of the three portfolio templates detailed in the next section. To create a simple static page follow the steps below.
- Create a new page, navigate to Pages → Add New.
- Give your page a title and add some content.
- Click the ‘Publish’ button.
- Choose this new page as your static Front page under Appearance → Customise → Static Front Page.
If you still wish to use the blog, you now need to create a second new page and title that page, though you don’t need to select a page template or add any content. Navigate to Appearance → Customise → Static Front Page and choose this page as your ‘Posts page’ in the customiser.
Inxhibit Portfolio Templates
Inxhibit provides you with three templates to display your portfolio posts. These templates can be as your Front Page or as portfolio pages elsewhere in your site.
Portfolio Grid: Displays your posts in a four across thumbnail grid with the title underneath.
Portfolio Image Grid: Displays your posts in a masonry style image grid.
Portfolio List: Displays your posts in a blog style format without any metadata.
Setting a Portfolio Template on a Page
- Create a new page, navigate to Pages → Add New.
- Give your page a title (you can leave the content area empty).
- In ‘Page Attributes’ under the setting ‘Template’, choose which of the three templates you’d like to use.
- Click the ‘Publish’ button.
- You must then choose a Category to use for your portfolio posts, see the next step.
Any page which uses a portfolio template can be set as your Front Page – see the section above ‘Creating a Static Front Page’.
Choosing a Category to use for Your Portfolio Posts
When using one of the three Portfolio templates you’ll need to choose a dedicated Category in order to group your posts together. This tells the template which category to use for your portfolio posts. If you’ve not already created a category, navigate to Posts → Categories and add a new category.
- Navigate to Appearance → Customise → Portfolio Category.
- Select a category from the dropdown.
- Click the ‘Save & Publish’ button.
You can also choose to exclude this chosen category from your blog posts by navigating to Appearance → Customise → Portfolio Category and checking the Exclude Portfolio Category box. This will ensure that your Portfolio posts do not appear in your blog.
Choosing How Many Posts to Display when using the Portfolio Templates
You can control how many posts to display when using one of the portfolio templates. This feature overrides the WordPress ‘Blog pages show at most’ setting found under Settings → Reading.
- Navigate to Appearance → Customise → Portfolio Category.
- Under ‘How many posts’ add the desired number.
- Click the ‘Save & Publish’ button.
Typography
Inxhibit includes hundreds of Google Fonts to choose from, the most popular fonts appear at the top of the menu. If you already have a Google Font in mind, start typing the name of that font in the box to search. You can independently choose a font for headings and a different font for the body text.
- Navigate to Appearance → Customise → Typography.
- Select a Heading font and Body font combination using the dropdown menus or search for a font.
- Adjust the Font Size to suit the chosen fonts using the slider.
- Click the ‘Save & Publish’ button.
Adding Social Media Links
The theme supports adding links to popular social sites with icons in the sidebar. Icons are available for, Twitter, Facebook, Instagram, YouTube, Vimeo, Flickr, Pinterest, SoundCloud, LinkedIn, Vine, Dribble, Behance, and GooglePlus. These social links do not appear on the simpler mobile view, they are visible when the site is in full desktop mode.
- Navigate to Appearance → Customise → Social Media.
- Enter the URL to your account for each service for the icon to appear in the sidebar.
- Use the checkbox ‘Show Social Links’ to hide/show the links.
- Click the ‘Save & Publish’ button.
Customise the Footer Credits and Copyright
You may change the footer text, email and copyright information.
Footer Email
- Navigate to Appearance → Customise → Footer.
- Enter your email address and the theme will convert the characters to HTML entities to block spambots.
- Leave this field empty if you do not wish to display an email address on the footer.
- Click the ‘Save & Publish’ button.
Footer Text
- Navigate to Appearance → Customise → Footer.
- Enter your new text here to override the default Inxhibit credits.
- Use the checkbox ‘Show Footer Text’ to hide/show the footer text.
- Click the ‘Save & Publish’ button.
Change the Copyright
- Navigate to Appearance → Customise → Footer.
- Enter the new copyright text without the © symbol or date, the date will change automatically at each turn of the year.
- Click the ‘Save & Publish’ button.
Using a child Theme
If you want to customise the Inxhibit theme further and you need to edit the code in the stylesheet (style.css) or theme template files, we strongly recommend creating a child theme so that any modifications are not overwritten when Inxhibit is updated in the future. See here for more information about creating a child theme.
How to Enable Pretty URLs
A permalink is the permanent URL to your posts or pages. By default they may look like this http://www.inxhibit.com/?p=123/. To improve aesthetics you can adjust the settings to achieve a pretty permalink, for example http://www.inxhibit.com/portfolio/.
- Navigate to Settings → Permalinks.
- Under ‘Common Settings’ choose the ‘Post Name’ option.
- Click the ‘Save Changes’ button.
Removing the Comments from Pages or Posts
You can disable comments by default, this will apply to any future posts published. You can disallow comments from posts and pages that have already been published.
Disable Comments on Posts and Pages already Published
- Navigate to the Post or Page.
- Uncheck ‘Allow comments’ in the Discussion panel. If you can’t see this panel you can switch it on from the ‘Screen Options’ tab.
- Click the ‘Update’ button.
Disable Comments by Default
- Navigate to Settings → Discussion.
- Uncheck ‘Allow people to post comments on new articles’.
- Click the ‘Save Changes’ button.
Widgets
Inxhibit supports a widgetized sidebar. Customise the sidebar area, located underneath the menus, with WordPress widgets to display categories, tags, search, etc. Please note that widgets do not appear on the simpler mobile view, they are visible when the site is in full desktop mode.
- Navigate to Appearance → Customise → Widgets.
- Drag available widgets into the Sidebar area.
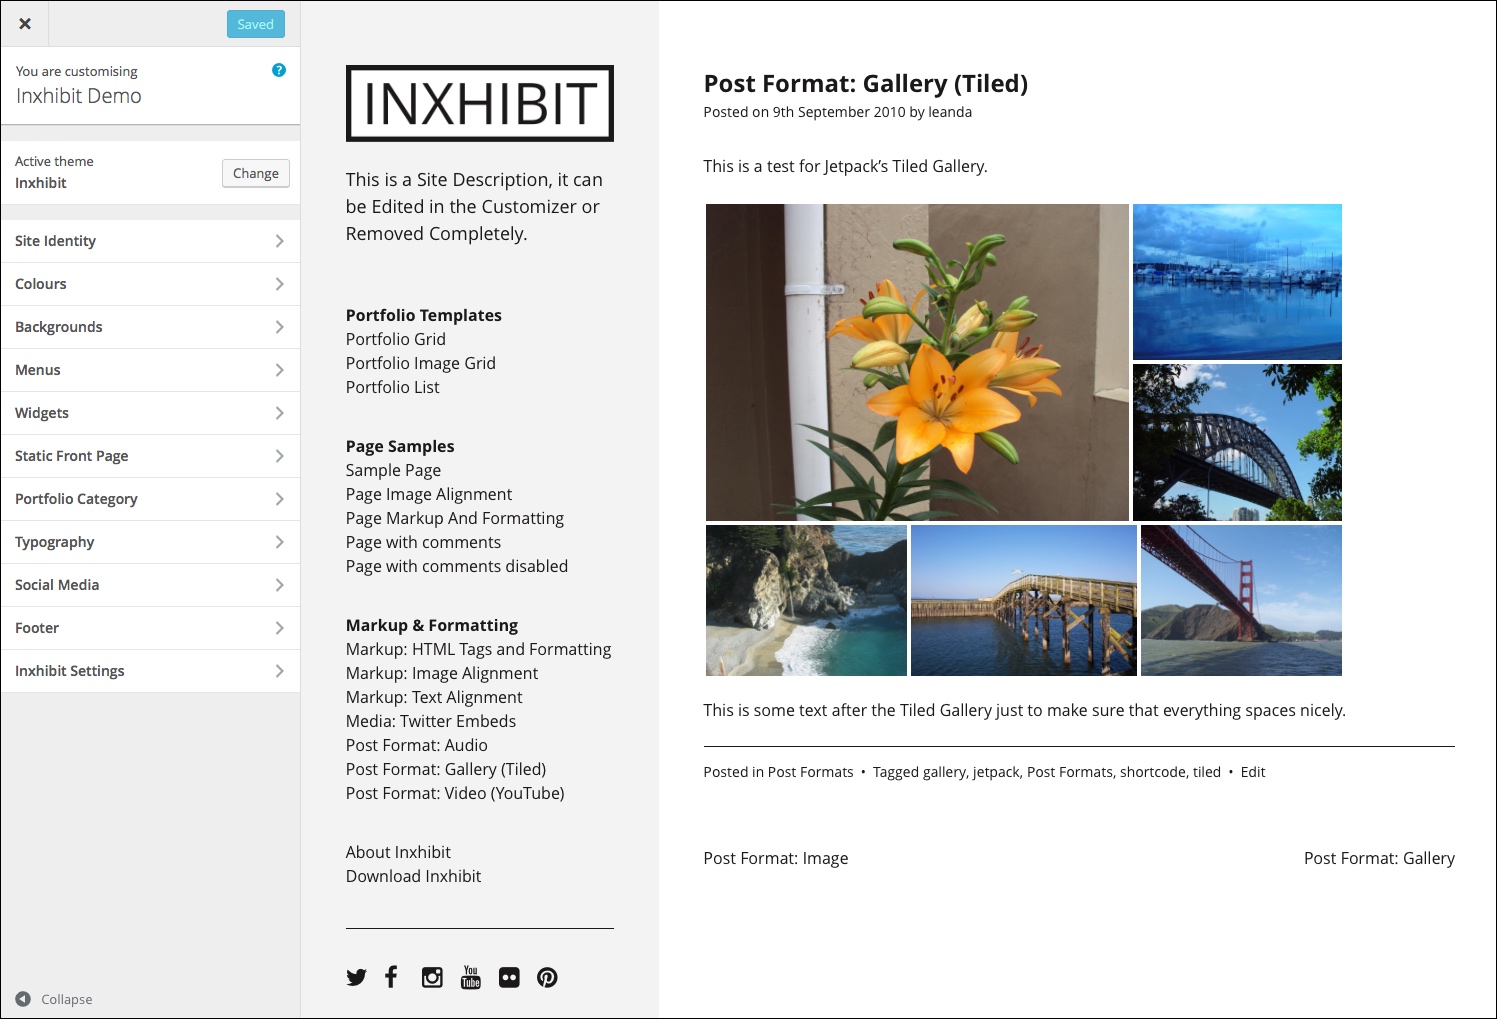
Jetpack Galleries
Inxhibit supports Jetpack Plugin Tiled Galleries which can be placed into posts or pages.
- Make sure you have the Jetpack plugin installed and the Tiled Galleries module is activated in your Jetpack settings.
- Insert a new WordPress gallery into the post or page using the ‘Add Media’ button and select ‘Create Gallery’.
- Select the images to include in the gallery and click ‘Create a new Gallery’.
- From the ‘Type’ dropdown select ‘Tiled Mosaic’.
- Click the ‘Insert gallery’ button.
- Click the ‘Update’ button.
Hide Post Author
Inxhibit provides you with the option to hide the post author from your post templates.
- Navigate to Appearance → Customise → Inxhibit Settings.
- Uncheck the box to hide the post author.
- Click the ‘Save Changes’ button.
Recommended Plugins
Royal Slider: Image Gallery & Content Slider for WordPress
BackUpWordPress: Simple automated backups of your WordPress powered website.
Wordfence: The Wordfence WordPress security plugin provides free enterprise-class WordPress security, protecting your website from hacks and malware.
Jetpack by WordPress.com
How to update the theme
If you have an active licence you will receive dashboard notifications when a new version of Inxhibit is available. Ensure you have backed up your theme files and database before running the updater.
Obfuscate your Email Address
The WordPress antispambot is available in this theme, this function converts any email addresses used in posts or pages to HTML entities to block spambots and prevent email addresses from being harvested. To use, instead of creating a mailto: link on your email addresses simply wrap the email address in the email shortcode as follows.
yourname@emailaddress.com